How to Cut and Weed Small Vinyl Designs with Your Silhouette Cameo 4
This post contains affiliate links. I may earn commission from qualifying purchases at no additional cost to you. I will never recommend a product I don’t use or trust.
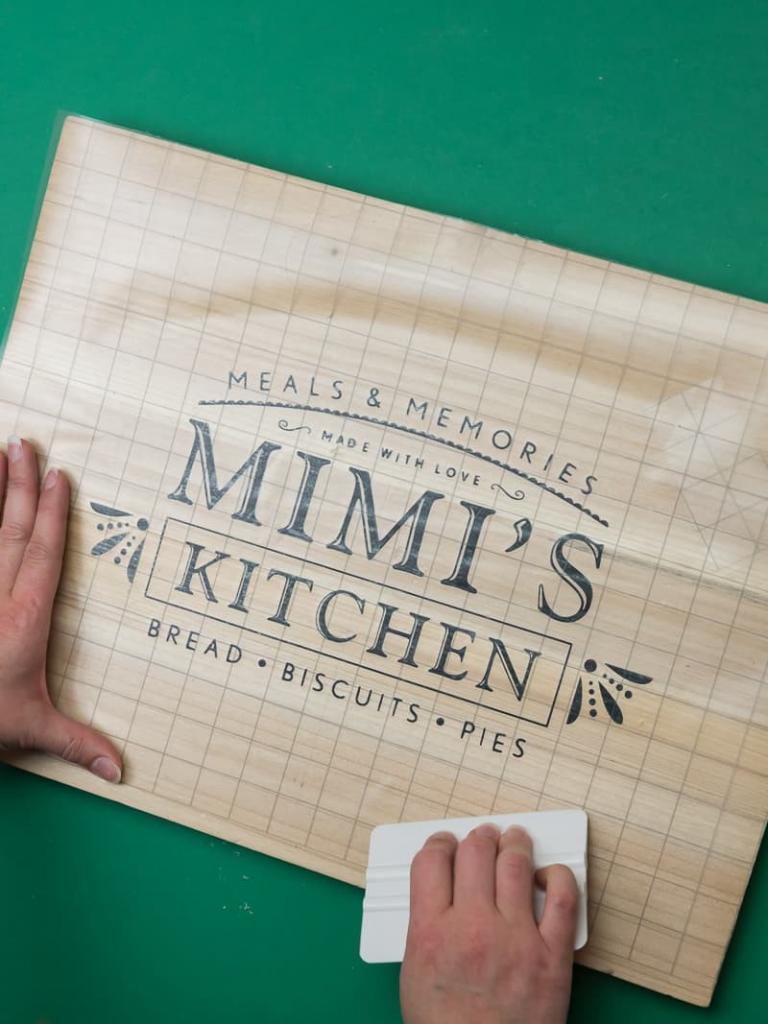
Lets learn how to cut and weed small vinyl designs with your Silhouette Cameo 4! We’ll teach you how to adjust your cut settings to get the perfect kiss cut on your adhesive vinyl every single time!

Have you ever cut a small design and then found out after weeding it that you lost the dot on an ‘i’ or some other part of your design?
It happened to me on my Hello 2021 project and I didn’t even notice until a reader told me about it!
It happens to us all and it is so frustrating to realize you’re missing pieces after the fact. But there are tips on how to cut and weed small vinyl designs with your Silhouette Cameo 4 so you get it right the first time!
There are a few different ways to make sure you get the perfect cut on your vinyl designs. First, adjust those cut settings!
If you cut your design and notice that the blade didn’t cut all the way through the vinyl do not remove your vinyl from the machine! Instead, adjust your cut settings and try again.
What materials do you need to make this DIY cutting board?
In order to make this cutting board vinyl decal you will need:
- Silhouette Cameo 4
- Cameo 4 Autoblade (make sure you have the right one for your machine!)
- Adhesive Vinyl
- Transfer Tape
- Cutting board (this one is from Hobby Lobby)
- My favorite weeding tool
Tips that will help you cut and weed small vinyl designs:
If you feel like you waste a lot of vinyl when you’re cutting small designs, this tutorial will help you troubleshoot issues and help you get the perfect kiss cut every single time!
What cut settings should you use when trying to cut small vinyl decals?
Usually the settings already programmed in your Silhouette Studio for cutting matte vinyl work well here:
BLADE: 1
FORCE: 10
PASS: 1
The only change I would make is to slow your SPEED all the way down to 1.
If you don’t turn your speed down your blade usually picks up the smaller pieces of your design and drags them with the blade for the remainder of the cut. This can result in the vinyl pieces blocking your blade and causing it to not cut through all of your vinyl.
Slow that blade down!
I also like to turn up PASS to 2, just to make sure everything cuts well the first time.
And always check to make sure your blade cut the entire design before you unload your cutting mat and vinyl.
What type of vinyl can you use on a cutting board?
You can use both adhesive vinyl and heat transfer vinyl on cutting boards.
I love using htv on wood like I did on these Christmas ornaments because the vinyl melts into the wood and gives it a painted look.
Learn more about heat transfer vinyl and how to use it on this post if that’s what you want to use on your cutting board!
What are the best tools to use to weed small pieces of vinyl?
It all comes down to the weeding tools you’re using.
My absolute favorite weeding tool is this one from Expressions Vinyl. I also love the pin pen tool!
And you can’t go wrong with a tweezy ring for vinyl. It is a really easy way to catch all those pieces you’re weeding!
How do you weed small pieces of vinyl?
My favorite way is to draw a box around the vinyl decal in the Silhouette Software and then weed inside the box after it is cut. Using the box is an easy way to isolate the design and make weeding easier so you aren’t dragging a large piece of excess vinyl over your design and accidentally moving or picking up parts of your design in the process.

FAQ’S for cutting and weeding small vinyl designs
Is this cutting board safe for food if there is vinyl on it?
No. You cannot place food on top of vinyl and then eat it. It is not safe for you to consume.
If you would like to use the cutting board to serve food on you should place a plate, aluminum foil, or parchment paper on top of the board and then place the food on top.
Never eat something that has been sitting on vinyl!
We like to use these cutting boards with vinyl decals on them for display only.
Is there any vinyl that is food safe?
No there is not!
If you wish to use a cutting board that has vinyl on it, the best way to do this is to either use a glass cutting board and mirror your vinyl design to put on the back of it OR use parchment paper or another barrier on top of your vinyl design so your food doesn’t touch it.
Other posts in our Learn Your Silhouette Series You Should Check Out:
- Learn to use your Silhouette Cameo 4
- What is transfer tape and how do you use it?
- How to layer vinyl decals with your Silhouette Cameo 4
- How to choose the best fonts for your projects
- How to use heat transfer vinyl
Ready to successfully weed small designs? Let’s go!

How to Successfully Weed Small Designs
These ideas on how to successfully weed small designs with your Silhouette Cameo will give you actionable tips to get a clean cut and easy weed for your projects!
Materials
- Vinyl
- Wood Cutting Board (from Hobby Lobby)
- Mimi's Kitchen SVG File
Tools
- Silhouette Cameo
- Weeding Tool
- Deep Cut Blade
- Vinyl Application Tool
Instructions
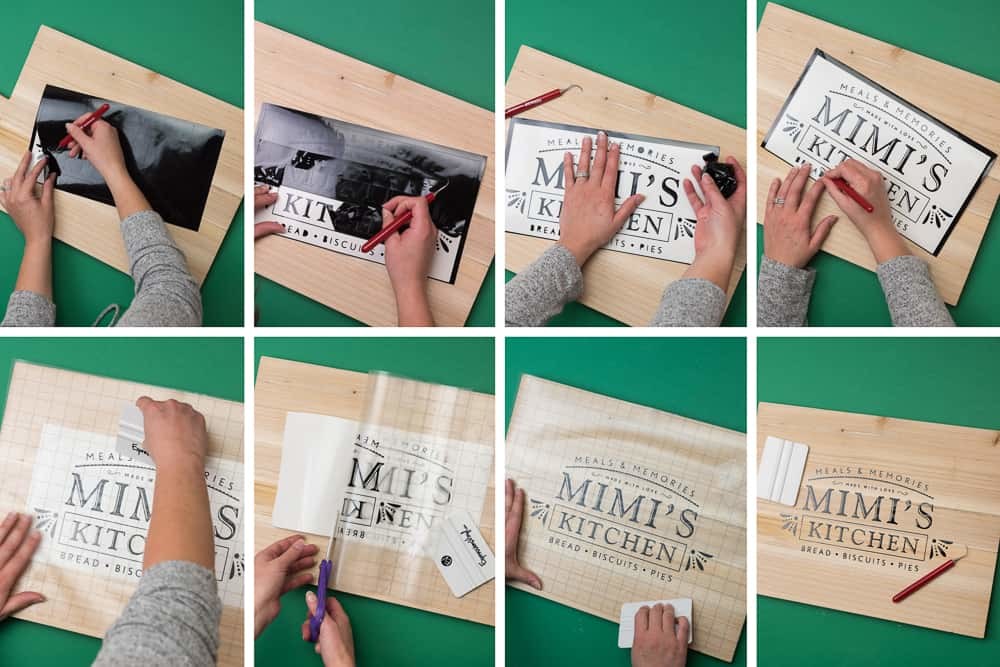
- Load your vinyl into your cutting machine.
- On the Silhouette cut page scroll down to the CUT SETTINGS. Use these settings: SPEED 1, FORCE 12, and PASSES 2.
- Make sure you have the right type of vinyl selected and hit SEND.
- BEFORE you unload the vinyl from your machine, take your weeding tool and try to weed a piece. If it comes up easily you're good to unload and continue weeding. If not, cut the design again. It's better to cut again than to unload it and find out that your design didn't cut all the way through (it happens, don't beat yourself up if it happens to you!).
- To help weed the smaller pieces you can use a small piece of SCOTCH TAPE to pick up the insides of the letters. I've also used small pieces of transfer tape. Both work and save you so much time!
Now let's put the vinyl on your board! 
- Measure your board and mark the middle on the top and sides. Then fold your design in half. Line up the paper with the markings on the board.
- Place a piece of transfer tape on top of the design and use your application tool to rub it onto the wood. Start to pull up the transfer tape, slowly. Make sure the design is coming up with it, if it's not place the transfer tape back down and continue to rub with the application tool until it does come up.
- Once you pull up half of your design, cut the white paper off from underneath the transfer tape. Then place the design back on the wood and use your application tool to rub it onto the wood.
- Do the same on the other side.
- Use your application tool and go over the design again, just to make sure it's stuck to the wood. Then pull up the transfer tape.
- Let the vinyl cure for 24 hours and then spray with sealant.
Notes
- Use a deep cut blade if you have one. The autoblade is nice but my cuts come out cleaner and easier to weed if I use my deep cut blade.
- Cut a small box around your design so that when you go to weed you're not messing with a huge piece of vinyl that'll likely fall and get stuck on your transfer tape.
- Weeding tools make all the difference when it comes to picking up small pieces from your designs. I just invested in this one and it's amazing. Such a difference from the one that came with my Silhouette machine!
Recommended Products
As an Amazon Associate and member of other affiliate programs, I earn from qualifying purchases.


Great information! What sealant spray did you use?
Thank you! It was polyurethane!